Extra 300 Profile Model description, specifications, and parts list
- Robareeno

- Feb 13, 2022
- 3 min read
Updated: Feb 23, 2024
What is this thing? What else will I need to build it?
Introduction:
The design of this plane came after wrapping up the Fokker DR1. After designing a plane with four wings (one at the landing gear) I wanted to try something far easier to print and assemble. I also wanted something that could print quickly, have great flying qualities, be durable, and if needed easily repairable or reprint able. Experimenting with the foaming nature of lightweight PLA got me thinking about how light something could be printed. Could it be printed as light as foam? Could I set the infill just right and then literally end up with a plastic part that rivals the weight of foam? Eh, no. But you can get it pretty stinking light. It looks better that foam anyway so in my opinion its a win.
I Always totally loved the little foamy profile 3D Aerobatic models. They were amazing performers and could teach so much about mastering aerobatic maneuvers as they slow everything down so much. Their simple construction was a plus to me, but what did turn me off was the lack of a true airfoil. The planes really don't fly. Chop the throttle and what the plane's dismal glide back to earth and you will understand this. Also, they are either indoor or dead air models. I was interested in making something just a little beyond that. That is what I landed on in the Extra 300 Profile model.
Specifications:
Length: 392 millimeters
Width: 462 millimeters
Weight: 277 grams ready to fly with battery. Ugh! Uncle Sam will want a registration number.
Maximum printer build plate:
All components were designed to be printed on a Creality Ender 3 Pro printer bed size of 220 x 220 x 250 max.
Airfoil:
Fully symmetrical NACA 11015 modified to 115% thickness
Printer Filament: Lightweight PLA is a must! Of the ones I've tried ColorFabb is the clear winner. In my experience the flow rate can be dialed far further back creating a lighter part, the color prints better, and the filament simply prints cleaner than others. I liked it so much I stocked up on it.
Parts We Used:
Some of these links are Amazon affiliate links. These are always of products we used and design the model around. There is no increase of price to you for using these links but the small commission we earn helps to offset the cost of hosting this site and developing models. It is greatly appreciated.
Powerplant:
Brushless 4000 KV Drone motor with mount holes of 20mm. Think Diatone Mamba 1404 or this one from Amazon that we have used as an alternative:
Battery:
I designed this model around a Tattu 450 MAH 4S drone battery.
Amazon link: https://amzn.to/4bHNM8p
Radio: I have come to prefer multi protocol radios like this one:
Amazon link: https://amzn.to/3PhDqCH
ESC:
Brushless 10 to 12 amp depending on capacity of your motor. The following link is what I used on the prototype:
Amazon Link: https://amzn.to/48usrfV
Receiver: Micro receiver. I have used the Lichifit 4 channel micro receiver.
Amazon link: https://amzn.to/49C66Om
But...... Honestly I can't keep up with this model without a flight controller so I end up using:
The Radiolink Byme A mini flight computer.
Amazon Link: https://amzn.to/4bPsohy
along with:
The Flysky FS A8S micro receiver.
Amazon Link: https://amzn.to/3Tb4oOG
Servos: You will need 3 sg90 mini servos.
Amazon Link: https://amzn.to/4bPVFsa
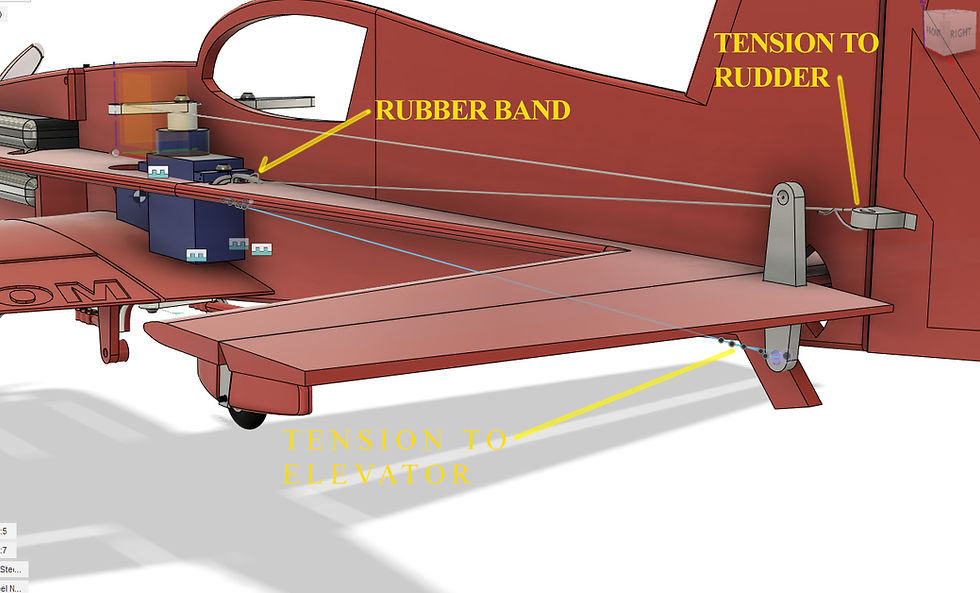
Hardware:
You will need (2) 1.6 x 12 mm hex head screws for the axles.
You will need(4) 1.6mm x 5mm hex head screws to mount the custom pushrods.

Conclusion: That is it for the specifications! Check the main blog here for the next steps. Feel free to reach out to us with any questions. We will attempt to clarify the construction blog including your input as much as possible.
Comments